
This entry is in English because lots of admins are looking for tips on the Apple support board. Obviously very few of them speak French so…
I wrote this after a week of searches and errors, while even contacting the € 1,000 Apple Premium Enterprises Support didn’t help.
So here’s what we’re going to do:
Assumptions
– We’re using Os X.5.6 Server which hostname his host1.company.com
– We’re r00t
– We’re working on a domain called dummy.com
– We’ve got cafeine and cigarettes at hand}
INDEX
1. Basic MX DNS configuration
Say you want your mail exchanger be labelled « mail » (sorry I’m no creative guy) and work with a box plugged at 100.100.100.100.
Also your webserver called « www » will be operating on a different box, say 200.200.200.200.
Here’s what your zone should look like:
; we declare the www host
@ 3600 IN A 200.200.200.200
; now the mail exchanger that's called "mail"
@ 3600 IN MX 10 mail.dummy.com.
; this so called "mail" exchanger has its own IP
mail 3600 IN A @ 3600 IN A 100.100.100.100
; by the way, don't forget to map "www" to the www host too
www 3600 CNAME .dummy.com
; we'll manage our list through a web interface at
lists 3600 CNAME .dummy.com
; adding an SPF record is a good idea:
; if source-ip is the mail exchanger, the test passes
@ IN SPF "v=spf1 a mx ip4:100.100.100.100 ~all"
At this point pinging your mail.dummy.com and lists.dummy.com should result to successfuly transmitted packets to 100.100.100.100.
2. Your server: setting up domains the Postfix-style
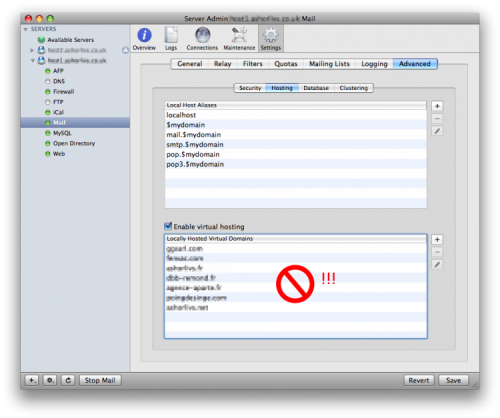
You usually setup your virtual domains using the « Locally Hosted Virtual Domains » in Server Admin. Well, not this time. We’re gonna use Postfix config files (isn’t that because we hate config file that we bought a Mac server? Anyway…)
Open Terminal.app, log in, and backup:
$sudo cp /etc/postfix/virtual /etc/postfix/virtual.bak
Ok. Now let’s edit the original file:
$sudo nano /etc/postfix/virtual
Add a new section for your virtual host:
dummy.com virtual
Press ctrl+o to save then ctrl+q to leave the editor.
Once again make sure you haven’t added this domain in Server Admin:
Now backup Postfix’s main config file and open the original:
$sudo cp /etc/postfix/main.cf /etc/postfix/main.cf.bak
$sudo nano /etc/postfix/main.cf
Edit your alias tables (should be located at the end of the file, use ctrl+w to make a search):
alias_maps = hash:/etc/aliases,hash:/var/mailman/data/aliases
virtual_alias_maps = hash:/etc/postfix/virtual,hash:/var/mailman/data/virtual-mailman
Leave the editor and process the virtual users file:
$sudo postmap /etc/postfix/virtual
Then reload postfix:
$sudo postfix reload
Now, trying to send an email to test@dummy.com should result in a plain old 550-error-rejection like this:
Jan 24 16:33:05 host1 postfix/smtpd[57226]: NOQUEUE: reject: RCPT from mon75-17-88-175-208-34.fbx.proxad.net[88.175.208.34]: 550 5.1.1 <test@dummy.com>: Recipient address rejected: User unknown in virtual alias table; from=<xxxx@italic.fr> to=<test@dummy.com> proto=ESMTP helo=<[192.168.0.1]>
Your mail server is responding.
Time for your first smoke now.
3. Basic email tests
Mails will be routed from our user accounts to Postfix. We are using an OpenDirectory LDAP accounts list, but I think it might also work directly with local accounts.
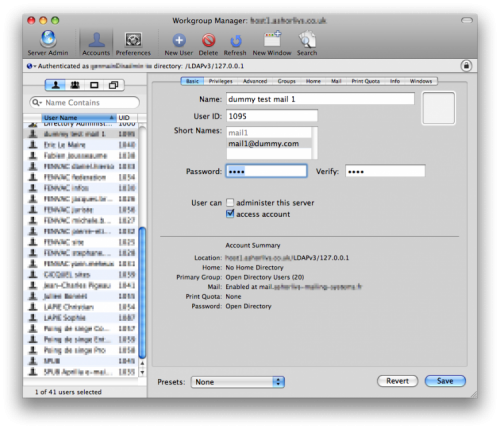
Open Workgroup Manager and create a first test mail account. Let’s call it « mail1 » (another proof that smoking does not improve creativity).
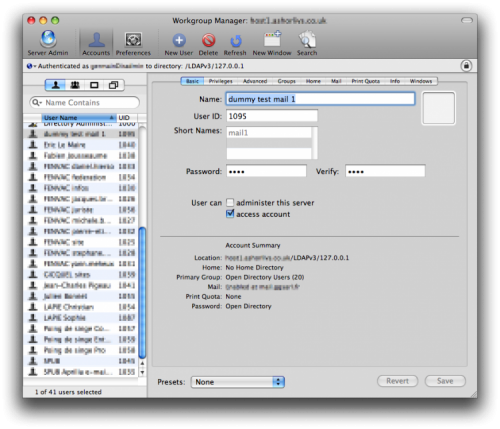
Create account
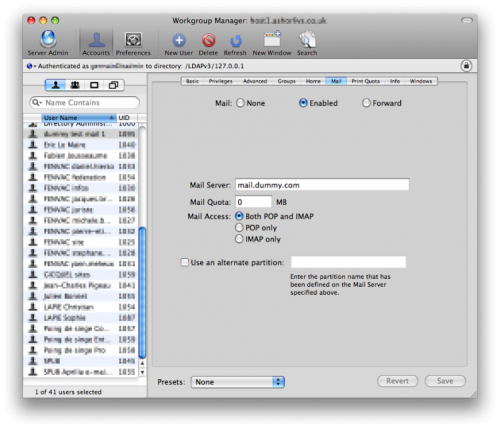
Enable emails
Using the Mail tab, enable mail services for the host we created before: mail.dummy.com
Back to the Terminal, map the user to the virtual domain:
$sudo postmap /etc/postfix/virtual
dummy.com virtual
mail1@dummy.com mail1
Remap and reload:
$sudo postmap /etc/postfix/virtual
$sudo postfix reload
Resending a test mail to mail1@dummy.com should result in this kind of successful delivery:
Jan 24 16:53:33 host1 postfix/smtpd[57378]: connect from mon75-17-88-175-208-34.fbx.proxad.net[88.175.208.34]
Jan 24 16:53:33 host1 postfix/smtpd[57378]: 744FBC8ABF: client=mon75-17-88-175-208-34.fbx.proxad.net[88.175.208.34], sasl_method=PLAIN, sasl_username=xxxx@italic.fr
Jan 24 16:53:33 host1 postfix/cleanup[57382]: 744FBC8ABF: message-id=<F31C572B-D87D-4E2C-B1C1-468EC07DAF1A@italic.fr>
Jan 24 16:53:33 host1 postfix/qmgr[57373]: 744FBC8ABF: from=<xxxx@italic.fr>, size=715, nrcpt=1 (queue active)
Jan 24 16:53:33 host1 postfix/pipe[57384]: 744FBC8ABF: to=<mail1@host1.company.com>, orig_to=<mail1@dummy.com>, relay=cyrus, delay=0.49, delays=0.32/0.01/0/0.16, dsn=2.0.0, status=sent (delivered via cyrus service)
Jan 24 16:53:33 host1 postfix/qmgr[57373]: 744FBC8ABF: removed
Jan 24 16:54:33 host1 postfix/smtpd[57378]: disconnect from mon75-17-88-175-208-34.fbx.proxad.net[88.175.208.34]
As you can see Postfix does map correctly the virtual name (mail1@dummy.com) to the OD account name (mail1). Remember we assumed that our server was nammed host1.company.com and that mapping should come clear to your geeky mind.
4. How do users will check their mails?
If you had the bright idea to enable the webmail on your host in Server Admin (web services) you should be able to login using « mail1 » as a username, and read your test mail.
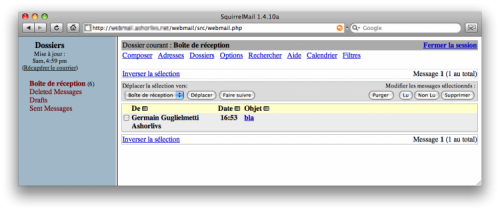
Webmail
(this should have worked even without the Postfix tweaking!)}
Now what comes to us, devoted service providers, is that users often get confused between usernames, email addresses, and websites url. As we can’t teach them the difference between an email and a website AGAIN, at least we could let them identify with their email (mail1@dummy.com) instead of the username (mail1). That’s easier for dummies.
Plus, in most cases, customers need a contact@mycomp.com. So are you going to give your customers a login that looks like they are treated like cattle, such as contact1, contact2, contact3, contact4, and so on?
No you’re not! While we are using Postfix-style mappings, we’re still able to use Apple-style’s Workgroup Manager aliases!
Add an alias as follow to the account and user will be able to login directly with his mail address on his client or webmail.
Email alias
Second smoke and cup of coffee.
5. Enabling mailing-lists on the server
The trick to enable Mailman mailing lists on Os X Server (not related to group mailing-lists) is to create a first one named « Mailman ». It’s not clear to me what it’s used for. Probably linkings mailing-lists with the bot.
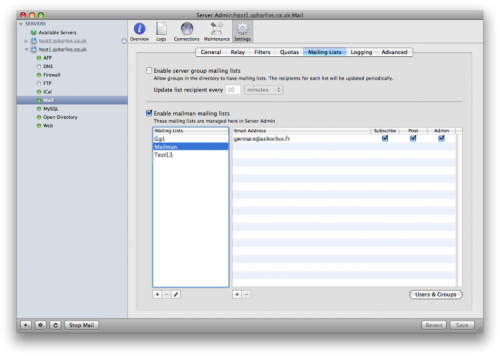
Server Admin
You’re never going to use this one BUT please do not delete it.
Now we’re ready to create our own mailing list. Let’s call it « list1 ». Of course you can use any address as an Admin user, even not hosted on this box.
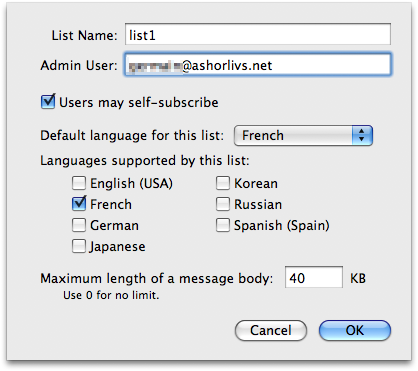
Server Admin
In seconds the Admin will receive a welcome email with his password and the urls to read the archives, suspend his subscription, etc:
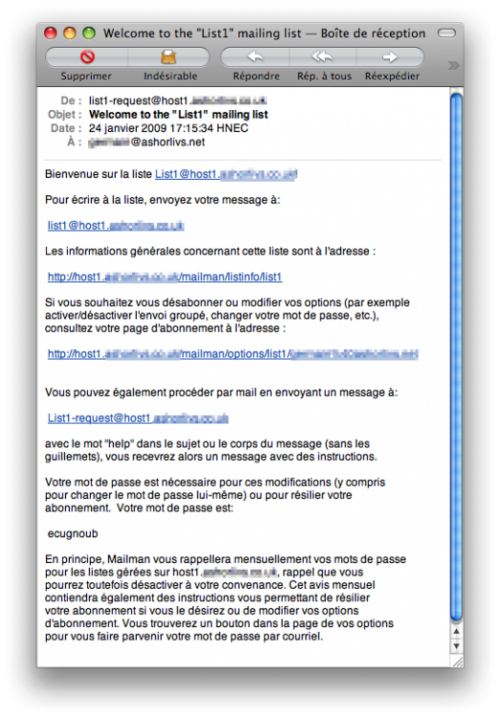
You’ve got mail
6. Using the web interface to customize the list
WTF?
Did you notice in the mail that our list his hosted at host1.company.com? (I’ve blurred my server name so you don’t get confused with many domains).
But we want our list be located @dummy.com!!
Well, it appears that Server Admin autolinks mailinglists to the hostname of the machine. Sure you can access to the web interface through this hostname if you have enabled it in Server Admin (web services) but any mail you will send to list1@dummy.com will result in this error:
Jan 24 17:22:02 host1 postfix/smtpd[57700]: NOQUEUE: reject: RCPT from mon75-17-88-175-208-34.fbx.proxad.net[88.175.208.34]: 550 5.1.1 <list1@dummy.com>: Recipient address rejected: User unknown in virtual alias table; from=<xxxxxx@italic.fr> to=<list1@dummy.com> proto=ESMTP helo=<[192.168.0.1]>
Do NOT be tempted to add a virtual mailbox in /etc/postfix/virtual as we did before, because this real address would catch and cage emails in its own mailbox, ruining your mailing-list dreams.
The first thing we want to do is repair the hostname mapping.
Go to the folder where Mailman binaries are located:
$cd /usr/share/mailman/bin
And run this command:
$sudo ./withlist -l -r fix_url list1 -u lists.dummy.com
Password:
Importing fix_url...
Running fix_url.fix_url()...
Loading list list1 (locked)
Saving list
Finalizing
Add a web host corresponding to this URL otherwise it’s just worthless. Cmd-Tab to Server Admin, Web services, Sites tab, create host (or alias of previous host) labelled « lists.dummy.com ».
Enable desired web services.
Save.
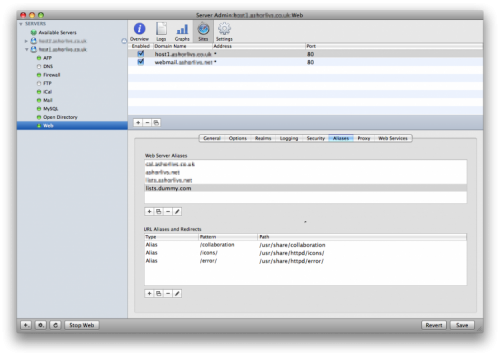
Sites tab
Now you can navigate to https://lists.dummy.com/mailman/listinfo/list1 and access the web-based interface!
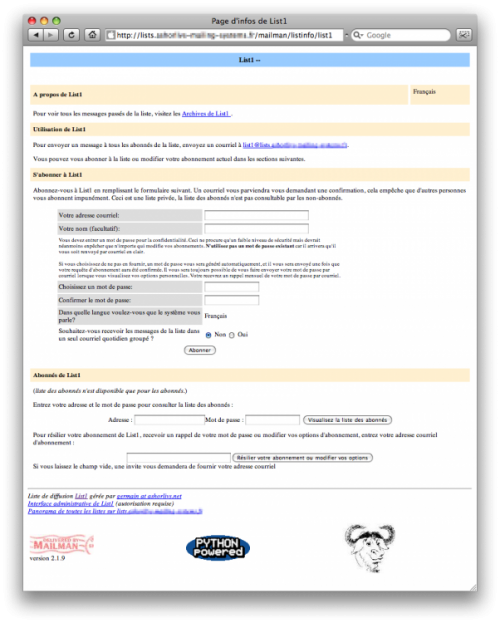
Web-based list info
Click the Admin link at the bottom and login with the password you provided when created the « Mailman » list. (do not even try to login with the subscription password you got by mail when creating list1@dummy.com it won’t work).
To map list1 to the domain dummy.com, scroll down to the host_name directive near the bottom and simply replace the current default hostname by the desired one.
Sorry I did not bother to set the web interface in English, because I assume you’re not dumbs, correct me if I’m wrong.
<doc37|center>
One of the first things you may want to do is going to the « Archives » menu and disable archives for the list.
Now you’re gonna need the coffee.
7. Assembling the pieces of this jigsaw puzzle
Have your aliases been created?
Check by opening the aliases file:
sudo nano /private/var/mailman/data/aliases
You should have a fun warning plus your two lists aliases:
# This file is generated by Mailman, and is kept in sync with the
# binary hash file aliases.db. YOU SHOULD NOT MANUALLY EDIT THIS FILE
# unless you know what you're doing, and can keep the two files properly
# in sync. If you screw it up, you're on your own.

# The ultimate loop stopper address
mailman-loop: /private/var/mailman/data/owner-bounces.mbox

# STANZA START: list1
# CREATED: Sat Jan 24 17:46:22 2009
list1: "|/usr/share/mailman/mail/mailman post list1"
list1-admin: "|/usr/share/mailman/mail/mailman admin list1"
list1-bounces: "|/usr/share/mailman/mail/mailman bounces list1"
list1-confirm: "|/usr/share/mailman/mail/mailman confirm list1"
list1-join: "|/usr/share/mailman/mail/mailman join list1"
list1-leave: "|/usr/share/mailman/mail/mailman leave list1"
list1-owner: "|/usr/share/mailman/mail/mailman owner list1"
list1-request: "|/usr/share/mailman/mail/mailman request list1"
list1-subscribe: "|/usr/share/mailman/mail/mailman subscribe list1"
list1-unsubscribe: "|/usr/share/mailman/mail/mailman unsubscribe list1"
# STANZA END: list1

# STANZA START: mailman
# CREATED: Sat Jan 24 17:46:22 2009
mailman: "|/usr/share/mailman/mail/mailman post mailman"
mailman-admin: "|/usr/share/mailman/mail/mailman admin mailman"
mailman-bounces: "|/usr/share/mailman/mail/mailman bounces mailman"
mailman-confirm: "|/usr/share/mailman/mail/mailman confirm mailman"
mailman-join: "|/usr/share/mailman/mail/mailman join mailman"
mailman-leave: "|/usr/share/mailman/mail/mailman leave mailman"
mailman-owner: "|/usr/share/mailman/mail/mailman owner mailman"
mailman-request: "|/usr/share/mailman/mail/mailman request mailman"
mailman-subscribe: "|/usr/share/mailman/mail/mailman subscribe mailman"
mailman-unsubscribe: "|/usr/share/mailman/mail/mailman unsubscribe mailman"
# STANZA END: mailman
If not, you can generate the list manually by running:
cd /usr/share/mailman/bin
$sudo ./genaliases
At this point we need to tell Mailman that we’re using a virtual domain instead of the localhost name. I haven’t found any user-friendly option in the web interface so let’s Cmd-Tab to Terminal once again, and backup the original config file:
sudo cp /usr/share/mailman/Mailman/mm_cfg.py /usr/share/mailman/Mailman/mm_cfg.py.bak
Edit the original:
$sudo nano /usr/share/mailman/Mailman/mm_cfg.py
Scroll down with ctrl-V then add this at the bottom:
#tell mailman we have a virtualhost here
POSTFIX_STYLE_VIRTUAL_DOMAINS = ['dummy.com']

#map this vhost with a mail server
add_virtualhost('dummy.com', 'mail.dummy.com')

#cool trick: if you want to be able to delete lists from the web-based
#interface, add the following line:
OWNERS_CAN_DELETE_THEIR_OWN_LISTS = 1

#lots of options are made available in this file:
#$sudo nano /usr/share/mailman/Mailman/Defaults.py
ctrl-O ctrl-w it.
Time to reload services:
$sudo /usr/share/mailman/bin/mailmanctl restart
$sudo postfix reload
8. Test it!
Now try to send a test mail to list1@dummy.com:
Jan 24 18:07:31 host1 postfix/smtpd[58392]: connect from mon75-17-88-175-208-34.fbx.proxad.net[88.175.208.34]
Jan 24 18:07:32 host1 postfix/smtpd[58392]: 18C1BC8D17: client=mon75-17-88-175-208-34.fbx.proxad.net[88.175.208.34], sasl_method=PLAIN, sasl_username=xxxxxx@italic.fr
Jan 24 18:07:32 host1 postfix/cleanup[58398]: 18C1BC8D17: message-id=<62121CB8-D501-4E94-A35A-C2640C29767A@italic.net>
Jan 24 18:07:32 host1 postfix/qmgr[58303]: 18C1BC8D17: from=<xxxxxx@italic.net>, size=713, nrcpt=1 (queue active)
Jan 24 18:07:32 host1 postfix/local[58399]: 18C1BC8D17: to=<list1@host1.company.com>, orig_to=<list1@dummy.com>, relay=local, delay=0.46, delays=0.3/0.01/0/0.15, dsn=2.0.0, status=sent (delivered to command: /usr/share/mailman/mail/mailman post list1)
Jan 24 18:07:32 host1 postfix/qmgr[58303]: 18C1BC8D17: removed
Jan 24 18:07:33 host1 postfix/smtpd[58403]: connect from localhost[127.0.0.1]
Jan 24 18:07:33 host1 postfix/smtpd[58403]: A6CF4C8D41: client=localhost[127.0.0.1]
Jan 24 18:07:33 host1 postfix/cleanup[58398]: A6CF4C8D41: message-id=<62121CB8-D501-4E94-A35A-C2640C29767A@italic.net>
Jan 24 18:07:33 host1 postfix/qmgr[58303]: A6CF4C8D41: from=<list1-bounces@dummy.com>, size=1957, nrcpt=1 (queue active)
Jan 24 18:07:33 host1 postfix/smtpd[58403]: disconnect from localhost[127.0.0.1]

It should work…
Mail is correctly dispatched and you should get as an Admin and/or a Subscriber, the e-mail:

Mail dispatched
(even if not on the screenshot) Note that mailing-lists URL are correct thanks to the withlist command we ran.
You can customize the From, Reply-to, Subject headers in the web-based interfaced. Default settings embed « [List Name] » at the begining of the subject and Reply-to will reply only to the user not to the list.
Go have fun with the front end.
Here’s what’s happening in clear lolspeak:
– Your mail HELLOES} list1@dummy.com through the SMTP
– smtp replys « HO HAI! Did ya know list1@dummy.com iz a cover, not hiz real name! »
– (mail) O’RLY???
– (smtp) Ya Rly!!1 U’re screwed!!1
– (mail) No Wai! Call Mailman plz.
– (Mailman) I’m in ur Postfix, routing ur emails.
– (both) Ho hai!
– (Mailman) list1 hiz real name iz list1@host1.company.com!
– (smtp) KTHXBYE! Sending mail to list1@host1.company.com then
– (Mailman) Won’t leave now. U need me for the archives.
– (stmp) O’RLY???
– (Mailman) Ya Rly. I can has bounces plz?
– (bounces) HO HAI! I’m in ur loop copying mail to archives! Done!
– (all) KTHXBYE!
… this is why and how you can access the list archives at
https://lists.dummy.com/pipermail/list1/2009-January/thread.html
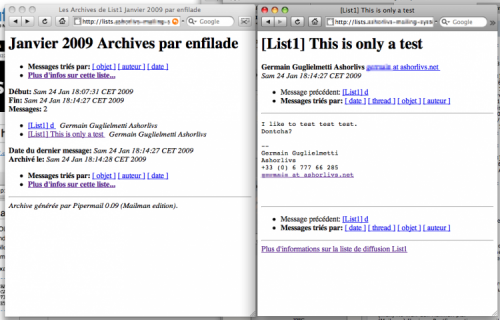
Archives threaded view
If you followed us previously I recommanded to disable archives during the test period. Now enable them, and set if you want the archives to be public or private.
9. You’re doing it wrong!
Still not working?
Checkpoint 1: wrong permissions
Try to repair until you get this reassuring message:
cd /usr/share/mailman/bin
$sudo /usr/share/mailman/bin/check_perms -f
Password:
Warning: Private archive directory is other-executable (o+x).
         This could allow other users on your system to read private archives.
         If you're on a shared multiuser system, you should consult the
        installation manual on how to fix this.
No problems found
Checkpoint 2: do not list dummy.com in BOTH mydestination and virtual_alias_domains
This is straight out of the box.
$sudo nano /etc/postfix/virtual_domains
If you still have dummy.com in this list, then it’s making a bad mix with the one you stated in /etc/postfix/virtual!
Checkpoint 3: WTF, virtual-mailman is empty!
Turns out it happens sometimes, don’t really know why. Might depends on the order you do the steps. In this case, clear it and rebuild aliases:
$sudo rm /var/mailman/data/virtual-mailman
cd /usr/share/mailman/bin
$sudo ./genaliases
$sudo /usr/share/mailman/bin/mailmanctl restart
Should fix the problem.
Chekpoint 4: 550-error
Do you have this in your SMTP log?
Jan 18 13:18:49 host1 postfix/lmtp[74275]: A9B7CBF45F: to=<list1@dummy.com>, relay=host1.company.com[/var/imap/socket/lmtp], delay=0.16, delays=0.13/0/0/0.03, dsn=5.1.1, status=bounced (host host1.company.com[/var/imap/socket/lmtp] said: 550-Mailbox unknown. Either there is no mailbox associated with this 550-name or you do not have authorization to see it. 550 5.1.1 User unknown (in reply to RCPT TO command))
Then it’s likely that you’ve NOT used Postfix-style aliases but Apple-style ones!
OMG… Did you actually READ this page?
Postfix is not communicating with Mailman at this point.
You should check that:
– you are using Postfix-style aliases,
– you have linked /var/mailman/data/aliases and /var/mailman/data/virtual-mailman in /etc/postfix/main.cf,
– you have actually enabled Mailman by creating the Mailman list,
– did you run the postmap command?
– is Mailman running?
– is Postfix running?
– are Mail services running?
$ ps -U postfix
  PID TTY           TIME CMD
58303 ??         0:00.05 qmgr -l -t fifo -u
58304 ??         0:00.02 pickup -l -t fifo -u -o content_filter
$ sudo serveradmin fullstatus mail
mail:setStateVersion = 1
mail:servicePortsAreRestricted = "YES"
mail:state = "RUNNING"
Checkpoint 5: Data Format Error
Jan 18 14:12:23 host1 postfix/pipe[74882]: 698E5BF735: to=<list1@host1.company.com>, orig_to=<xxxxxx@italic.fr>, relay=cyrus, delay=0.28, delays=0.14/0.01/0/0.13, dsn=5.6.0, status=bounced (data format error. Command output: list1: Mailbox does not exist )
Holly crap this one is annoying I spent 4 days on it.
It appears if one of these conditions are passed:
– You are not using Postfix-style aliases or the files are corrupted, rebuild them
– You are not pointing to the correct aliases tables in main.cf
– You have broken permissions
– You forgot to fix mm_cfg.py
– Possibly other reasons I haven’t found yet, please post them if so.
[10<-]10. Archives
If you’ve missed the « Disable the archives first! » when creating the list, you might have lots of « test test one two test » in your archives.
To Edit, there are two methods:
– difficult, editing .mbox files… forget it.
– easy but boring, editing html files! Go to :
cd /private/var/mailman/archives/
Select the correct folder if your archives are private or public, then go to the folder labelled as your list is (in our example: list1/). Edit the html files.
11. Web resources
DNS
– Where to check your DNS configuration ?
– How to define an SPF record ?
MAIL SERVICES
– Apple’s guide to Mail services admin (PDF)
– TopicDesk’s guide to converting Apple-style domains to Postfix-style (PDF)
– You should check the whole Os X section at TopicDesk they do really good work (you know mailbfr don’t you ?)
POSTFIX
– RTFM !!!!!!!!!
– Do not declare domains twice and so on
– This thread provides great tips but beware, the paths are for Debian not Os X
APPLE
– Search for « mailman » and « postfix » in the support boards